Part 1
Structured literacy is one of those approaches that just clicks once you see the impact it has on students, especially those who need a little extra support with reading. The UFLI Foundations program lays out the steps of a structured literacy lesson in a way that’s clear, practical, and easy to follow. It’s like having a roadmap that guides you through each essential part of a reading lesson—no guesswork, just a straightforward plan that builds skills step by step.
Let’s walk through each component of a UFLI lesson, breaking down what it is, why it matters, and how to use it right away in your own classroom. Let’s dive in and explore how to bring the best of structured literacy to your students!
The Importance of Routine in a Structured Literacy Lesson
Having a consistent and predictable routine maximizes instructional efficiency and helps students focus on the concepts being learned rather than worrying about what comes next. Routines create a safe and predictable learning environment, allowing students to feel secure and confident. When students know what to expect, they can allocate their attention more effectively to mastering new skills rather than managing the anxiety of changing routines. Over time, this familiarity with the lesson structure will foster greater independence, helping students focus on the steps of each lesson and deepen their understanding.
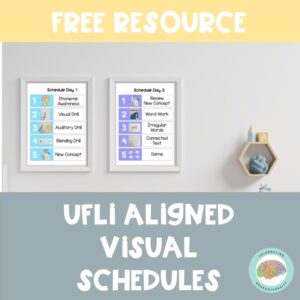
Step 1: Phonemic Awareness
What is phonemic awareness?
Phonemic awareness is all about helping students hear, identify, and manipulate the individual sounds, or phonemes, in words. These skills are crucial for learning to read because they allow students to connect spoken sounds to written letters. In the UFLI Foundations program, phonemic awareness activities involve blending and segmenting sounds, setting the stage for successful decoding and encoding.
Why teach and practice phonemic awareness?
Phonemic awareness is one of the most reliable predictors of reading success. Research consistently shows that students with strong phonemic awareness are better equipped to decode words and understand the relationship between sounds and letters. By focusing on this foundational skill, you’re not only preparing students to read but also giving them the tools to succeed in every other part of literacy instruction.
How is phonemic awareness incorporated into lessons?
In a UFLI lesson, phonemic awareness activities are engaging and systematic. Here’s how you can incorporate these into your lessons:
- Blending Sounds: Say the phonemes of a word one at a time (e.g., “/c/ /a/ /t/”) and have students blend the sounds to say the full word (“cat”). You might say, “Listen as I say a word one sound at a time. After I say each sound, we’ll blend them together to make a whole word.”
- Segmenting Sounds: Say a word, like “dog,” and have students repeat it before breaking it into its individual sounds (“/d/ /o/ /g/”). Use prompts like, “Listen as I say a whole word. Repeat the word, then say each sound. The word is ‘cat.’ What is the word? Let’s say each sound—/c/ /a/ /t/.”
What if a student makes an error?
Use the I do, we do, you do correction procedure to help students fix mistakes.
- I do: “The sounds in ‘cat’ are /c/ /a/ /t/.”
- We do: “Say the sounds in ‘cat’ with me—/c/ /a/ /t/.”
- You do: “Your turn! Say the sounds in ‘cat’—/c/ /a/ /t/.”
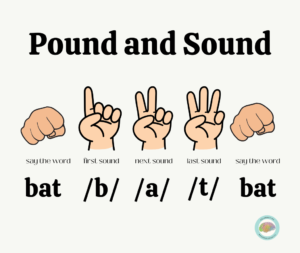
Adding multisensory activities can make these exercises even more impactful. Students can “pound and sound” by tapping each sound on the table as they say it, or use their fingers to represent the phonemes as they break apart the word. These activities engage multiple senses, making the learning more memorable.
Here is a pound and sound example with Jack Hartman
What if my student needs more phonemic awareness practice?
As a reading interventionist, I often use supplemental programs like Equipped for Reading Success or Heggerty to provide additional, detailed exercises for strengthening phonemic awareness. For students with reading difficulties, this kind of structured practice is especially critical, as it lays the groundwork for mastering more complex reading and spelling skills, making it a vital component of any structured literacy program.
Step 2: Visual Drill
What is the visual drill?
The visual drill is all about helping students quickly and accurately recognize letters and graphemes by sight. This step focuses on building strong connections between letters and their corresponding sounds, which is crucial for fluent reading and writing. During this activity, students practice identifying graphemes, naming their sounds, and reinforcing their understanding of the relationship between learned phonemes and graphemes.
Why do we do the visual drill?
Quick, automatic recognition of letters and their sounds is essential for fluency. When students can effortlessly recognize graphemes, they free up mental energy to focus on higher-level tasks like comprehension. The visual drill also serves as a review of previously taught skills, helping to strengthen phoneme-grapheme correspondences. It’s also an opportunity for teachers to assess what students know, identify graphemes that need more reinforcement, and ensure mastery before introducing new material.
How do we do the visual drill?
Here’s how to implement the visual drill in your lesson:
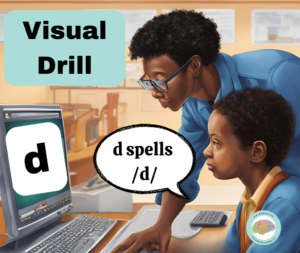
Use Flashcards or Slide Decks: Present a letter or grapheme to the student and ask them to say the corresponding sound(s). For example, you show the letter “d” and prompt the student to respond, “D spells /d/.”
Start with Newest Graphemes: UFLI lessons begin with graphemes most recently introduced and work back through previously taught graphemes to reinforce mastery.
The goal is to build automaticity, this drill should take about 3 minutes, so the pace should be quick. If a grapheme is not automatic, pause and review it explicitly.
What if a student makes an error?
Use the I do, we do, you do correction procedure to help students fix mistakes.
- I do: “F spells /f/.”
- We do: “Say it with me—F spells /f/.”
- You do: “Your turn— (F spells /f/).”
For additional support, you can incorporate multisensory techniques to help students who need more reinforcement. Use this list below in order and only use the steps necessary for the student to retrieve the sound.
- Adequate Processing Time: Allow students time to think and retrieve the sound without rushing them.
- Kinesthetic Support: Have students trace the letter with their finger while saying its sound.
- Keyword Cues: Show a keyword or picture associated with the grapheme to trigger memory.
Where can I find these resources?
Flashcards and slide decks are excellent tools for the visual drill. Slide decks can be organized with newer graphemes listed first and descending to previously mastered ones, making it easy to review systematically.
- Grapheme Flashcards– from UFLI Foundations Toolbox
- UFLI Lesson Slide Decks-from UFLI Foundations Toolbox- note the newest graphemes are listed first and descend to the ones that have been practiced the most.
If students struggle with certain graphemes, use targeted interventions, adjusting the number of repetitions and scaffolds based on their needs. The visual drill is flexible and can be tailored to individual students or small groups, ensuring everyone has the opportunity to build fluency and confidence.
Step 3: Auditory Drill
What is the auditory drill?
The auditory drill focuses on reinforcing the connection between sounds (phonemes) and their written symbols (graphemes). During this activity, students listen to a sound provided by the teacher, repeat it, and then write the corresponding letter or letter combination. This step helps solidify the relationship between hearing a sound and representing it in writing, a critical skill for both reading and spelling.
Why do we do the auditory drill?
This drill strengthens auditory processing, which is essential for accurately decoding and encoding words. By pairing the sound with the act of writing, students engage multiple senses, making the learning process more effective. Regular auditory drill practice also builds spelling proficiency and helps us to monitor students’ mastery of phoneme-grapheme correspondences.
How do we do the auditory drill?
Here’s how to implement the auditory drill:
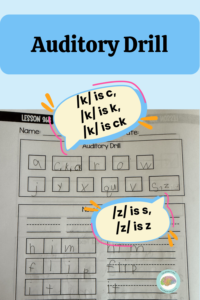
- Say a Sound: Begin by saying a sound aloud. For example, say “/f/.”
- Student Repeats and Writes: The student repeats the sound and writes the corresponding grapheme. For example, the student writes “f” while saying, “/f/ is f.” Another example, when teaching the sound /k/, you can reinforce the multiple graphemes that represent it: “/k/ is c, /k/ is k, /k/ is ck.” This explicit instruction strengthens the student’s ability to associate multiple spellings with a single sound.
- Materials: Use a whiteboard, UFLI aligned notebook, or even have students trace the letters with their fingers on the table or carpet.
The goal is to build automaticity, this drill should take about 5 minutes, so the pace should be quick. If a phoneme is not automatic, pause and review it explicitly.
What if a student makes an error?
Use the I do, we do, you do correction procedure to help students fix mistakes.
- I do: “/f/ is f.”
- We do: “Say it with me—/f/ is f.”
- You do: “Your turn—/f/ is f.”
For additional support, you can incorporate multisensory techniques to help students who need more reinforcement. Use this list below in order and only use the steps necessary for the student to retrieve the sound.
- Adequate Processing Time: Allow students time to think and retrieve the sound without rushing them.
- Kinesthetic Support:Have the student say the sound a few times
- Keyword Cues: Ask the student for the keyword associated with the sound (e.g., “kite” for /k/).
- Visual Support: Show a keyword or signal for the letter if they can’t retrieve it independently.
Where do I find these resources?
- Sound Articulation: Modeling correct sound production for students is extremely important.
- Sound Walls, Charts, and Keyword Lists: These tools can act as visual references for students, aiding students who need extra support.
- UFLI Sound Wall Materials– from UFLI Foundations Toolbox
- Free vowels with keywords poster- found in my free resource library
- Student Notebooks: Using a structured literacy notebook enforces the fast-paced structure and routines of the lesson, allows students to track their progress, and provides teachers with a way to monitor growth over time.
- Students might also benefit from tactile options like writing in sand or using gel boards to make the activity more engaging and multi-sensory.
If students struggle with certain phonemes, use targeted interventions, adjusting the number of repetitions and scaffolds based on their needs. The auditory drill is flexible and can be tailored to individual students or small groups, ensuring everyone has the opportunity for mastery.
Step 4: Blending Drill
What is the blending drill?
The blending drill focuses on helping students practice combining individual sounds (phonemes) to form whole words. This activity reinforces phonics skills, promotes automaticity in decoding, and allows students to review skills from previous lessons. During the drill, students use graphemes to systematically blend sounds, turning them into complete words—a foundational skill for fluent reading.
Why do we do the blending drill?
Blending is an essential skill for reading fluency. It trains students to move seamlessly from one sound to the next, reducing pauses and hesitations when reading. By teaching students how to connect sounds, we’re accelerating their ability to decode words efficiently and supporting the growth of their phonics skills. This activity also improves confidence as students begin to recognize and decode words more automatically.
How do we do the blending drill?
Here’s how to implement the blending drill:
- Start with a Word: Present the first word for the student to decode. For example, write or display the word “flat.”
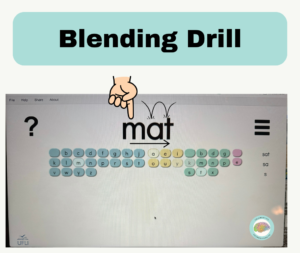
- Sound it Out: Point to the first grapheme (e.g., “f”) and have the student say the sound. Move to the next grapheme (“l”), and continue until all the graphemes in the word are identified.
- Blend the Word: After each grapheme is sounded out, glide your finger under the word and prompt the student to say the whole word: “/fffllllaat/ flat.”
- Change One Sound at a Time: Once the first word is complete, change one grapheme in the word to create a new word (e.g., change “flat” to “flap”). Repeat the process to reinforce phonics patterns.
UFLI lessons include carefully selected word chains designed to review the phonics skills that have been taught. These word chains help students practice blending while building confidence in their ability to decode.
What if a student makes an error?
Use the I do, we do, you do correction procedure to help students fix mistakes:
- I do: “That word is /fffllllaat/ flat.” Glide your finger under the word as you model blending.
- We do: “Say it with me—/fffllllaat/ flat.”
- You do: “Your turn—/fffllllaat/ flat.”
For additional support, use these steps in order as needed:
- Tap Below the First Sound: If the student makes an error, prompt them to start over and tap below the first grapheme while saying, “What’s the first sound?” This helps them take responsibility for finding and fixing their mistake.
- Blend Sounds Gradually: If needed, focus on blending the first two sounds before adding the third. For example, blend “/fl/” and then move to the rest of the word.
Blending drills should be quick-paced, lasting about five minutes, to encourage automaticity.
Where do I find resources for blending drills?
Blending drills can be done with a variety of tools and resources:
- Grapheme Flashcards– from UFLI Foundations Toolbox
- UFLI Virtual Blending Board App: A digital resource created by UFLI Foundations for making the words that students will read in this part of the lesson.
Additional Tips
As you guide students through these drills, be sure to offer behavior-specific praise to reinforce their effort and progress. A simple comment like, “Great job remembering the two sounds for ‘s’!” can go a long way in building confidence and keeping students motivated.
Use these review steps as a chance to monitor students’ skills to see what they know and what skills might need more reinforcement. By doing this, you can tailor future instruction to meet each student’s specific needs, ensuring they continue to build on a solid foundation.
Remember, these four steps are designed to serve as a warm-up and review. They should be quick, efficient, and engaging, taking no more than 15 minutes in total. The pace keeps students focused and ensures they are ready for the next part of the lesson, without becoming fatigued. By maintaining a consistent routine, you’re not only maximizing instructional time but also helping students build the confidence they need to tackle more complex skills.
These foundational steps—phonemic awareness, visual drill, auditory drill, and blending drill—are the building blocks of a structured literacy lesson. They create a predictable and supportive learning environment, helping students develop confidence and fluency in their reading skills. Each step works together to ensure students have the tools they need to connect sounds, symbols, and words effectively.
In Part 2 of this series, we’ll dive into the remaining components of a structured literacy lesson, including the introduction of new concepts, irregular words, and connected text reading. By implementing these steps consistently, you’ll establish a routine that fosters growth, independence, and success for every student. Stay tuned to take the next step on this structured literacy journey!

